Now that you have the fundamentals of Herringbone Stitch under your belt. I bet you are wondering if there is a way to speed this process up a little bit.
And there certainly is.
Let me introduce you to the Accelerated Herringbone technique.
The technique is super simple as it merely involves adding two or more rows of beads per stitch to each column or stack of the bead work.
The additional beads will grow the length of the project much quicker, but there are a few changes that occur, when you use the faster method.
But we will get into that in a moment. First let’s get to the beads.
Tools and Materials
For this exercise, use two colors of the same size seed beads to make the thread path easier to learn.
Use a shorter piece of thread for practice, two feet should suffice.
2 colors – 11/0 or 8/0 Seed Beads
2 feet of Beading Thread
Size 10 or smaller Beading Needle
Scissors or Thread Burner
The Ladder Stitch Base
This method begins exactly as our previous tutorials, with a ladder stitched base.
The base can be either even or odd count. First up below I will talk about even count accelerated herringbone. I am using the sample piece I created in Flat Herringbone Even Count to demonstrate the technique.
In the video at the end you will see the odd count method.
Begin by creating your ladder stitch base with an even number of beads.
Reinforce the row by stitching back through all the beads to the opposite end.
Or you can sew under the bottom thread bridge between the 5th and 6th bead and sew up thorugh the last bead to exit from the top of the row.
To Get Started
According to the Handbook, you should do at least one row of regular herringbone and step up.
Refer back to Even Count if you need help with this step.
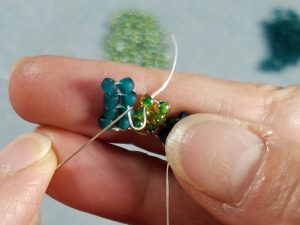
Now for the acceleration, we are going to double the beads picked up for each stitch.
Pick up four beads and sew down through the top bead of the next column.
The step up is the same as normal.
Pass the needle up thorugh the top bead of the next column.
Repeat the steps to the end of the row.
After you add the last four beads, we need to step up into the new row (the beads just added).
The working thread is exiting the bottom of the bead on the base.
Reverse direction and sew up through the second to last bead on the same base row.
Sew up through the last two beads added to the current row.
Now you are in position to add a new row.
It is that simple.
You can pick up 3 beads per stack or even 4 in you like. That would be 6 or 8 per stitch, consecutively.
But the more beads you pick up per stitch, the less thread bridges and connected beads in your bead work.
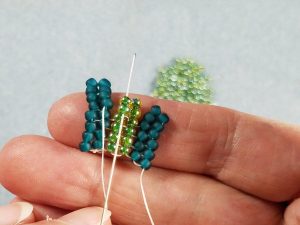
Let’s look at this up close.
In traditional Herringbone, we pick up two beads and pass down one. As we step up into the next column, the thread bridge connects the two beads on the base.
In the next row, the thread bridge will connect the beads of the previous row.
In accelerated Herringbone, we pick up four beads and pass down one. As we step up into the next column, the thread bridge also connects the two beads on the base.
However, as we work the next row, the thread bridge only connects the top two beads and leaves a gap between the lower two.
These gaps, without thread bridges connecting the beads, are more noticeable when you increase the amount of beads you pick up per stitch.
The uniformity and structure of the piece is altered somewhat.
So there is a trade-off when using the accelerated technique.
Next, let’s take a look at the process for Odd Count Herringbone.
I hope have found the information in this tutorial useful and will give this method a try.
Please like and share my posts with your friends and fellow jewelers and don’t forget to subscribe to the blog, newsletter and my YouTube channel.
In the next post….
I will share the method used for the Traditional Herringbone Start.
It is a fussbudget to work with but I think it is neat once you get it started.
Bead Weaving 101 is a series based on my review of the Bead & Button 2019 Bead Stitching Handbook.